PCB - Care
Do you care about your boards?
To collect pcb:s of video games is not all fun and play. No. It is also a responsabillity and sometime a demanding job to restore and clean up an older game which have been lying on the shelves of an operators, or in a dusty storage area where perhaps not only dust is present, but also moist, dirt and who knows what more.
Many times in games from places/ countries with dynamic climate, pcb:s can be stuck with the toughest layers of dirt. From hot, dry and dusty summers to damp and rainy cold winters, the dust on the board settles to later harden with condensed water due to quick differences in temperature when bringing a video game into a warm building from a cold outside climate.
The "dirt-issue" is infact only a question of removing a layer of natural material wether it is hardened clay, food or candy remains, or simple dust. There are more serious issues when it comes to getting a pcb in "good shape". Here you will learn what things matter and what things seem to matter but don't really.
Inspecting, restoring & maintaining:
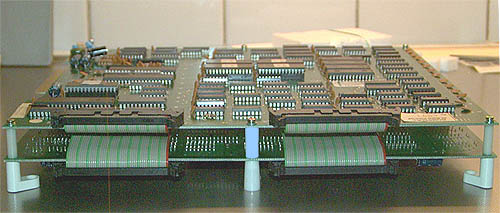
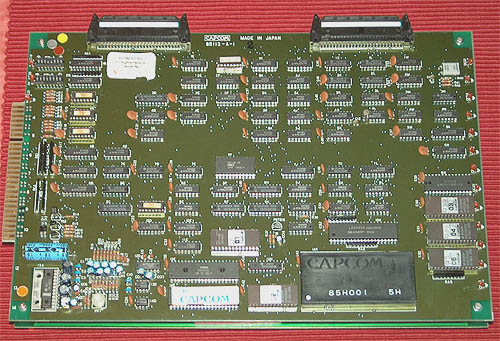
Below is a picture of Tiger Heli pcb. It is in good shape except for some scratches on top and bottom components, and a little piece from one of the plastic connectors linking the two boards is broken off. This pcb is by all means presentable in both function and visuality.
It is always important to use equal lenght pcb-spacers
in double-pcb designs to avoid unnecessary bending of the pcb. Also point
the pcb-feet inwards to save space when packing, and to easily stand the
pcb-set vertically if needed when removing the pcb linking cables.
Many times I also add extra padding between pcb:s in places
where they can be easilly bent towards one another. This basic care is
to stay sure that no foil/ trace will open or loosen due to frequent handling
of the pcb.. 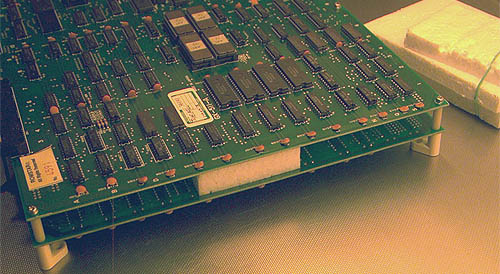 (Another example of how to best prepare a pcb for shipping
I have made for a japanese colleague a while ago... Picture
>>)
(Another example of how to best prepare a pcb for shipping
I have made for a japanese colleague a while ago... Picture
>>)
"Pcb in good shape"
"A pcb in good shape" is perhaps a general expression which is ofcourse a bit vague describing the actual state of the pcb. Besides that the game should run and be 100% playable including all which it means as a stable picture, stable sound in all channels, for me personally there are a couple of additional factors which are more or less significant:
1. Dust and dirt is no problem, as lemonade spill, old sticky labels and such. There are plenty of chemicals to use on old glue and label remains. The pcb can be easilly washed under water (just like washing dishes) if roms, any battery based components, and socketed components are first removed. The pcb is then easily dried over the hot exhaust of a good vacuum cleaner for 30 minutes. In other words, I would prefer a board soaked in lemonade and dipped in choclate or sprayed with dirt, to a clean but really bent board.
2. Bad things are: acid damage, various corrosion of metal parts like IC-legs/pins, corroded traces, and rusty areas. These things are often not restorable.
3. Most physical damage is bad. Damage like chipped off corners of pcb, nudged or worn corners are ok as long as the screw holes are good, cracked areas on pcb e.g at the corners, or fracture caused by heavy bending of pcb, broken parts like the plastic connectors which are difficult to desolder from pcb to replace, modified chips and components not belonging in the original design, cut or open traces, foil damage and various amateur like wire patching. Well, most visual blemishes in fact.
Conserning repaired boards: One possible problem with repaired boards is that if there has been a "frying"-accident where a few or more components have been burnt due to a short on the pcb or wrong power input, somtimes components "still working" are not as working as they seem. With replaced roms/eproms and components the game might still run flawlessly, but is often prone to fail sooner or later depending on a few things like poorly programmed replacement roms, or other possible half-fried component failures. An eprom programmed with a general voltage which might not be the optimal programming-voltage for the particular eprom in question sometimes may show ok in test, but can fail later. However all these things are fixable.
3. Loose or missing capacitors is no problem. With the help of proper soldering equipement they can be easilly replaced with new ones even smaller and better. Cosmetically different? Yes, but if done properly it only shows the care and good treatment that the board has recieved by the previous owner.
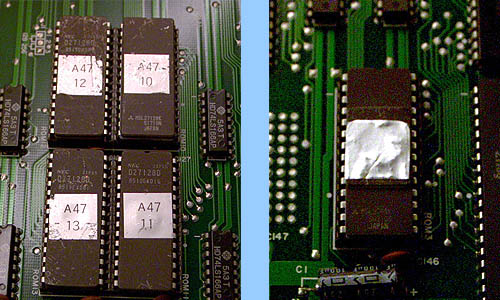
4. Heavy scratches on roms, IC:s and other components are not nice, but are ok if the pcb itself is not scratched too much (The pcb is often a second hand used item and cannot be expected to look like brand new pcb). Sometime if roms with "windows" are scratched to the extent that the label covering the "window" is off, I usually just put an extra label on top to keep any sunlight from the "window". This may seem a vane method, but it certainly eliminates one risc of damaging the ROM ICs, or freezing the game while photographing with flash. I also keep the original label under the new one to avoid eventual suspision of a non-original rom which could be badly programmed (you never know who programmed it, or how).
Cleaning:
People handle pcb:s differently, from operators to private collectors and any in between changing hands there are plenty of ways the pcb can sustain damage. Even if a pcb is often quite robust and durable/ flexible, the fact that a pcb is a complex set of circuits and sometimes sensitive components is important to remember. It is not simply a "magic disc" which draws cool stuff on the monitor when you apply power to it. It's an item worth handling with care and a certain "know-how" if it is to have a long life with you. Game manufacturers in general have a policy of not supporting games older than 5 years. The warranty is gone and so is the support. But the game can under good cicumstances function for many years longer. Especially those older classics from the seventies and eighties are worth taking care of since they stand for the innovativity and creativity of young pioneers in computer and electronic amusement. Not to mention they are the fathers & mothers of our modern multi billion dollar amusement industry today which we so stressfully try to keep up with.
Besides the function and physical "health" of the game, there is the hygien to think about also. If not for the reason to still have our hands clean after connecting the pcb to our cabinet, then for the simple reason to keep dirt "eating" away the hardware itslef. If a game has been operated in a humid environment close by the ocean or close by a heavilly trafficated road, salts, acids, polution in general will eat your pcb! Humidity plus metal is not equal to rust nor corrosion. Humidity plus dirt plus metal is. I have seen several half-eaten pcb:s (mostly older Atari:s), and it's a scary fact. That is why it is important to maintain a good hygien of your pcb:s so that you get good connection and function at all time. Not to mention good looks too!
I will go through step by step how to wash/ clean the pcb from dust and other dirt. Also how to remove any unwanted labels and sticky things with "aceton" - bought in your local grocery store.
Warning: Read all the text if you are to attempt to wash your pbc:s. Not all pcb:s can be washed under water as illustrated in this chapter. Remember that batteries and other sensitive components are not to be washed. A basic knowledge about electronics and electricity is important if you are to handle pcb:s as I describe.
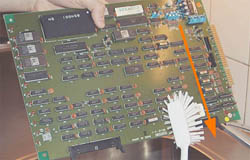
Picture below is a Gun Smoke pcb which I won on ebay very cheap. Infact it was so cheap I alomst felt as if I was robbing the seller and I am ashamed to even speak about the price. Now, if you take a good look at this picture you can see that the pcb is physically complete. No missing components or other damage, I even contacted the seller to ask if the board had been repaired, it hadn't. So basically this is a pcb i great shape! Yes, the pcb is a little bent, but then again I have never seen a completly straight Gun Smoke pcb. It's up to us now to make it look "presentable".
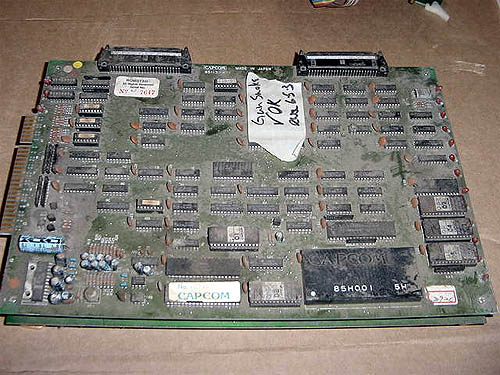
Note: It is one and the same Gun Smoke pcb used in this example. The cleaning proccess was not documented in real life because nobody was home at the time to hold the camera while I was doing the actual cleaning. Thus I have only been able to simulate the cleaning proccess carefully.
| Use a soft paint brush brushing and blowing the worst dust and dirt off the board over the kitchen sink. Remove any unwanted stickers and labels which could make cleaning difficult. |  |
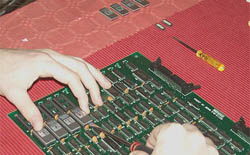 |
Then remove all socketed IC:s and connected boards to simplify handling when washing. Put the components on a flat surface in the exact order they were on the pcb. Or simply take a photo of the IC layout before you remove the IC:s. This simplifies the assembly-proccess of the board-set. Use a damping material underneath the PCB to keep any pins under the board from bending. |
| Fill the sink up with warm water and dish-washing detergent. Before putting the pcb into the water, use a soft brush/ regular paint brush to clean off the worst dirt, depending on how dirty the board initially is. | 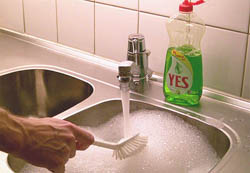 |
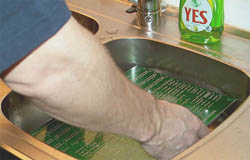 |
Then sink the pcb under water a brief moment, raise it, use your regular dish-washing-brush (a softer plastic type, never a metal brush!), or a regular paint brush to gently slide along the board between the IC:s and where the dirt may be more stubbern or stuck. Watch your moves, do not bend fragile components with the brush. With a smaller paint brush make circular movements to reach dirt underneath components. |
| Always very gently. Sink the pcb under water again and repeat the proccess if necessary. Keep in mind that some stickers and labels are "factory-labels". Now, hardcore collectors with a demand for serialnumbers and brand / maker -labels may want to finish this proccess qicker to avoid the factory labels coming off. |  |
 |
Use different angles to access all dirt. In areas where the pcb is densly populated or has oddly shaped components (usually around the sound amplifier), use a cirkular motion of brushing to get to the dirt. Just like brushing your teeth. |
| Then, wash the board off under fresh tapwater. And make a last check for any remaining dirt which may still be stuck on the board. | 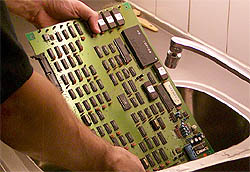 |
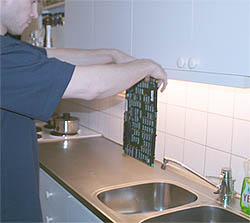 |
Wash off both surfaces of the pcb and let the water drip off for a few seconds. You may even benefit by "throwing" the water off the board, but be careful, this only works on smaller boards. Larger pcb:s are too wobbley and sensitive to be exposed to a "throw". (I've cleaned Tempests and I can tell you those boards are not to be thrown, only dripped). Just hold them a while and let the water drip off a little before starting the drying proccess. |
| After the "wet-cleaning" quickly use a non-smelly kitchen cloth to dry away water around popular labels and open/ flat areas (if existsing) on the pcb. This optimizes and speeds up the final drying proccess. | 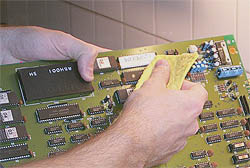 |
Compressed air and a good aim is necessary to force water out from under components and IC:s. This will further decrease the drying time and asure that no water remains hidden. This step should be repeated at least one more time in the middle of the vacum-drying to check for water.

| Put your vacum-cleaner close to a wall to be able to stand the board on top of the hot exhaust. Leave it there for 20-30 minutes. Go polishing any IC:s if necessary (mind the IC-legs, handle IC:s very gently), prepare the second pcb if present. To clean the roms and socketed chips you need a toothbrush and two small bowls of hot water. One filled with soap water and the second filled with plain water for washing off the soap. | 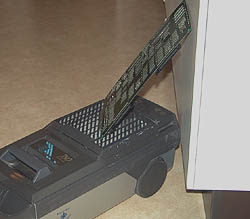 |
Always make sure the pcb is completly dry before you apply power to it. One good method testing if it's dry is to blow (with mouth) compressed air under IC:s and sockets. If you see water drops from under the components you need to leave the board on top of your vacuum exhaust a while longer. Or speed the proccess up with an additional hair-dryer. A false impression is that the board can look dry and ready, but under the IC:s there may still be some water. Remember that water shorts. Better safe than sorry. I usually pick the board up after 5 minutes of drying time to blow "compressed" air under the IC:s and put back on the vacuum, but after 3 or 4 boards I feel dizzy becasuse of the oxygen rush, so I never clean more than 4 boards at a time. Blowing mouth-air speeds up the drying proccess quite a bit though.
Re-assemble the pcb-set together in reverse order, adding damping polystyrene between the boards if necessary to avoid the "Bent Screw Syndrome" and bent boards. (This should have been done already in the factory but hasn't, and look at all those bent boards out there...). Plug it in and hope you've dried it properly. Remember: a "cooked" pcb is even worse than a fried one.

Final touch: If any sticky stuff from old labels remains after the wet-cleaning, use aceton to quickly and thoroughly remove it. Take a soft piece of tissue, apply some aceton (mind not soaking the tissue), place on top of the sticky stuff, hold for 3-5 seconds and then slide the sticky stuff off the surface. Repeat if necessary. Don't expose the pcb surface too long to aceton as it can "clean off" more than you intended. Put all IC:s in place and check that no legs are bent and that all IC:s are oriented in the proper direction and in their correct sockets.
Oh look! It's brand new Gun Smoke! Where did you get that from?
- No, it's the same board.
HIGH-QUALITY
PICTURE OF THIS CLEANED GUN SMOKE >>
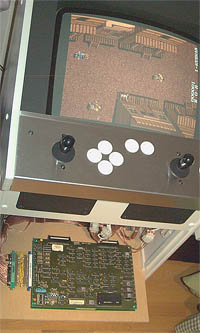 |
Great, it works! I must have done something right. Hehe... good luck with yours. This is my third Gun Smoke now (and I've got even more of Ghosts'n Goblins). I don't know why I keep byuing them, I don't even hang out on auctions anymore. But when I see an old Capcom board on ebay, I simply get it. It's as natural to me as helping an old lady across the street. It's non-debatable. Not that I need more than one pcb to play the game, but I just can't stand to watch a good old Capcom game lying about in the dirt on the road to hell, ending its life in the hands of some brat with a vicious power supply. Tomas |